Have you heard of Power Yoga before?
Okay, let’s start with a simple one.
What is that one common thing between a dancer, a gymnast, and a ballerina?
They all have swift movements and beautiful grace and one of the crucial factors responsible for this is flexibility. They have a very flexible body and a strong core. They are not born with a resilient body. They train hard to achieve it.
While you may not be one of them but who would not want a flexible body and beautiful grace?
Yoga or gym? It has been a hot topic for debate since ages. In many ways yoga is more efficient than gym as it relies on your own body for strengthening unless gymming which rely on weights or other equipment. With gym it takes more time to build strength.
What is Power Yoga?
Power yoga is a fitness-based vinyasa practice. It includes several forms of energetic vinyasas (a series of poses done in sequence). It is proven to be very useful in improving body flexibility. There are many types of yoga which have their own set of practices and benefits. Power yoga is one of them.
It enhances the stamina and balance, increases the strength and burns more calories.
If you feel that yoga cannot have the same effect as strength training, then you are mistaken. Power yoga is considered an intense workout. It can be compared with strength training as the same results can be obtained.
So if you are looking for something stimulating that would leave you energized and calm at the same time, then power yoga is your go-to option.
Read on to know how power yoga helps in improving strength and flexibility and which poses you should be starting with, if you are a beginner.
How Power Yoga Increases Strength and Flexibility?
Power yoga is a dynamic practice that involves a full-body workout. You have to synchronize your poses with your breath.
So, what is the difference between yoga and power yoga?
Power yoga is different from traditional yoga as it consists of several poses that need to be performed in flow.
Another core difference between power yoga and traditional yoga lies in their pace. The yoga poses may be the same in both forms of yoga, but the pace is different.
Traditional yoga is performed at a slow pace with a break of 15 seconds between asanas. Power yoga is intense, performed at a fast pace, and there is continuity between asanas. You can choose the speed that tests your strength.
You will find less of chanting and meditation in power yoga. It focuses more on strengthening your muscles. You need to hold the poses for a longer duration until you feel the burning sensation and this is exactly what builds strength and improves flexibility.
Power Yoga Poses For Building Strength and Flexibility For Beginners
Many people feel that power yoga is something that only experienced yogis can do. While it is true that power yoga is the more intense form of yoga, there are surely some poses that beginners can start with.
An important point to remember before you begin with the exercises is to have an empty stomach. Practice all the poses on an empty stomach or at least four to five hours after your meals. This way, you will not experience any discomfort.
1) Ardha Chandrasana/Half Moon Pose
Step-by-step Instructions:
- Stand straight.
- Maintain a comfortable distance between your legs.
- Twist your right foot outwards to point towards the right side.
- Stretch your arms sideways.
- Bend to your right side and try to touch your right foot with your right hand.
- Your left hand will be on your left hip.
- Inhale completely and place your right hand on the floor a couple of inches ahead of your right foot.
- With a swift movement, raise your left leg and bring it such that it is parallel to the floor.
- Raise your left hand upwards, pointing towards the sky.
- Maintain this pose for 15-30 seconds. Release and repeat on the other side.
Benefits of Ardha Chandrasana/Half Moon Pose
This pose is excellent for the ankles, thighs, hips, and abdomen. A good stretch is felt in the hamstrings, calves and groin area. It makes the spine more flexible. It is a good practice for women with menstrual disorders. It also helps in resolving back pain.
2) Utkata Konasana/Goddess Squats

Step-by-step Instructions:
- Stand straight.
- Take your legs shoulder-width apart.
- Raise your hands upwards as you inhale.
- Exhale and bend your knees and come in a squatting position.
- Simultaneously bring your arms down and place them on your thighs.
- You can repeat this for 30 counts.
- Gradually as your stamina increases, you can do the advanced version of this exercise. After the 30 counts, you can maintain the squatting position and pulse for five counts.
- Inhale and bring your hands upwards while straightening your knees.
- Again begin the next 30 counts of Utkata Konasana.
Utkata Konasana/Goddess Squats Benefits:
This pose strengthens your thighs, core, shoulders, and glutes. It also boosts blood circulation and opens up the groin and buttocks.
3) Adho Mukha Svanasana/Downward Facing Dog Pose

Step-by-step Instructions:
- Stand on your knees.
- Now place both your hands on the floor a few feet away from your knees. Assume marjarasana or cat pose.
- Now lift your hips and knees such that you form an inverted V.
- Lock your head between your arms.
- Suck in your abdomen.
- Inhale and lift your right leg. Now bend the knee and bring it towards your chest.
- Exhale and stretch out the leg. Bring it down on the floor.
- Repeat the same on the other side.
- You can repeat this for 8-10 counts on each side.
Adhomukh Svanasana/Downward Facing Dog Benefits:
This practice strengthens the whole body and more particularly the arms, shoulders, legs, and feet. It tones the muscles and increases blood circulation to the brain.
4) Adhomukh Svanasana/ Downward Dog with modification (2)
Step-by-step Instructions:
- Come in the downward dog position. Your body should resemble an inverted V.
- Inhale and raise your right leg. Take it as high as possible.
- Bring it down just above the floor and bend it inwards towards your chest.
- Raise the heel of your left foot and pulse it three times as you exhale.
- Bring the left foot down as you stretch out your right leg.
- Place the right foot on the floor.
- Repeat the exercise with your left leg.
- You can do ten counts with each leg.
Benefits:
This practice helps in making the spine more flexible. It tones and strengthens the arms and legs. It also helps in making the lung muscles strong and thus increasing the lung capacity.
5) Ashwasanchalana/Downward Dog With Lunges

Step-by-step Instructions:
- Come in the downward dog position.
- Inhale and lift the right leg. Exhale and get it forward and place it between your arms.
- Pulse the left knee three times.
- Stretch the right leg out and upwards. Repeat the exercise.
- Repeat for ten counts with each leg.
Ashwasanchalana/ Downward Dog With Lunges Benefits:
It helps in opening up your groin and hips. It also helps in toning your thighs and hips and strengthening the ankles and knee joints. It makes the spine more flexible.
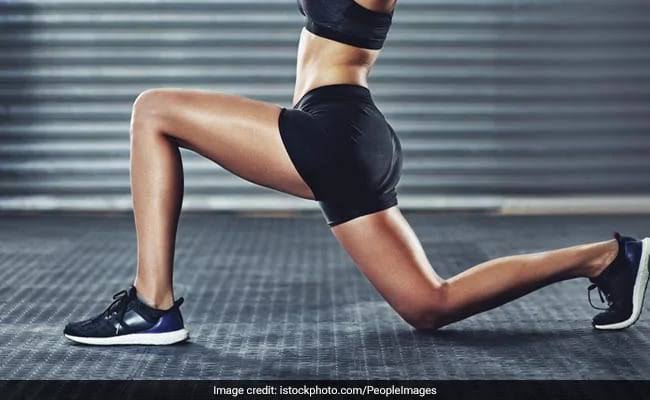
6) Standing Lunges
Step-by-step Instructions:
- Stand straight.
- Keep hip-width distance apart between your legs.
- Inhale and raise your hands towards the sky.
- Exhale and bring them down and touch the floor.
- Take your right leg back and immediately bring it forward again.
- Release and come up.
- Repeat this with the left leg.
- You can do 8-10 counts with each leg.
Standing Lunges Benefits:
Lunges make hips and thigh muscles flexible. They also tone the gluteal muscles and strengthen the core.
7) Marjarasana/Cat Pose (Variation 1)
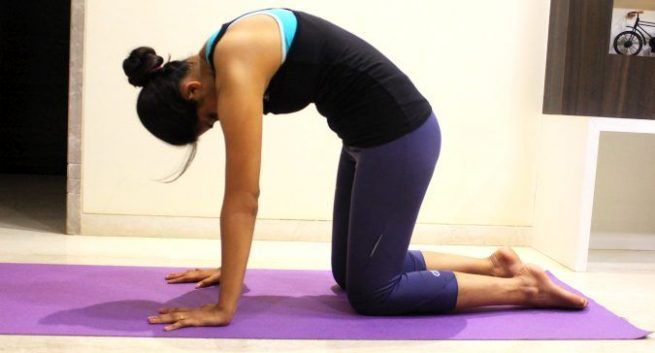
Step-by-step Instructions:
- For Marjarasana, get on your all fours. Your back should resemble a table top.
- Stretch out the right leg. It should be parallel to the floor.
- Lift the leg upwards while inhaling and bring it down towards the floor while exhaling.
- Continue pulsing for 10-15 times.
- Bring back the right leg in the starting position.
- Now, repeat the same with your left leg.
Marjarasana/Cat Pose (Variation 1) Benefits:
Marjarasana makes the spine more flexible. It improves digestion and blood circulation. It also tones the abdomen. It strengthens the thighs and hips.
8) Marjarasana/Cat Pose (Variation 2)
Step-by-step Instructions:
- Come in Marjarasana or cat pose.
- Inhale and lift your right knee slightly above and start rotating it in a clockwise direction.
- Exhale and move it in an anti-clockwise direction.
- The movement should be from the hip joint to the knee. There should be a minimum movement of the torso.
- Repeat the same with your other leg. You can make 5-6 rotations on each leg.
Marjarasana/Cat Pose (Variation 2) Benefits:
This pose makes the spine flexible. It makes the knees strong and strengthens the gluteal and hip muscles. It tones the thighs and hips.
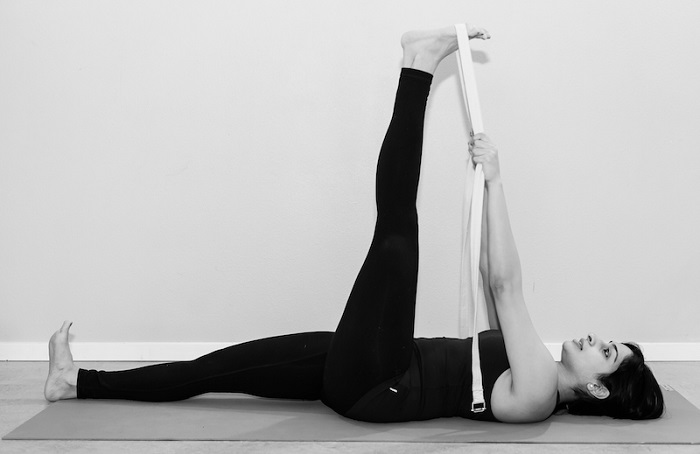
9) Padangushtasana in Lying Down Position
Step-by-step Instructions:
- Lie on your back.
- Inhale and take your hands towards your head side. Place them on the floor with the back of your hands touching the floor.
- Exhale and bring your hands up. Simultaneously raise your legs from the floor and maintain them such that they are perpendicular to the floor.
- Try to touch your toes.
- Inhale and go back to the starting position.
- You can repeat this exercise for ten counts.
Padangushtasana Benefits:
Pandangushtasana has a calming effect on your mind. A good stretch is experienced in the calf muscles and hamstrings. It makes the thigh muscles strong. It improves the blood circulation towards the brain and relieves insomnia and headache.
10) Vasisthasana/Side Plank Pose
Step-by-step Instructions:
- Lie on your stomach.
- Tuck your toes and place your hands near your shoulders.
- Stretch your hands and come up in the plank pose.
- Now, shift your body weight on the outer edge of your right foot. Stack your left foot on your right foot.
- Raise your left hand and move it upwards towards the sky.
- Your body should be laterally balanced on your right side.
- Release the pose.
- Now repeat the pose on the left side.
- You can repeat this 5-6 times on each side.
Vasisthasana/Side Plank Pose Benefits:
This pose helps in strengthening the shoulders and arms. It also makes the wrists strong. It tones the abdominal muscles and legs.
11) Chaturanga Dandasana/Push-ups
Step-by-step Instructions:
- Start with sitting in vajra asana pose.
- Come on your all fours. Your back resembles the table top.
- Tuck your toes and come up in high plank. Do not arch your back or contract your hips.
- From the high plank, bend your elbows, squeeze your stomach and bring your body down, just above the floor.
- Your body should be in one straight line. It should be parallel to the floor.
- Again straighten your elbows and come up to the high plank pose.
- You can repeat this for 5-6 counts. Increase your counts gradually as this exercise requires a lot of practice.
Chaturanga Dandasana/Push-ups Benefits:
This pose is challenging but once mastered, it provides excellent benefits. It tones the abdomen. It makes the shoulders, arms and thighs strong. It also strengthens the core muscles.
12) Balasana/Child’s Pose
Step-by-step Instructions:
- Sit in Vajrasana. Now come on your fours and take the cat pose.
- Inhale and take your hips back and lay your torso on your thighs.
- Your forehead touches the floor, and your hands should be stretched in front of you.
- As you exhale, come back in Marjarasana pose.
- Repeat this exercise for 10-15 counts.
Balasana/Child’s Pose Benefits:
Balasana is a relaxing pose. It reduces anxiety and stress. The internal organs get massaged and get activated. It also strengthens the spine and tones the buttocks and thighs. It also makes the ankles more flexible.
13) Vriksasana/Tree pose (with variation)
Step-by-step Instructions:
- Stand straight.
- Lift your right leg and bend it at the knee such that the heel touches your glutes.
- Fold your hands in front of your chest. Maintain your balance.
- Now, bend at your waist and keep your back flat.
- Keep your upper body parallel to the floor.
- Stretch your left leg outwards such that it is parallel to the ground.
- Your body should be balanced on one leg. Maintain your balance.
- Repeat the same with the other leg.
- You can do ten repetitions with each leg.
Vriksasana/Tree pose Benefits:
This pose improves balance. It makes the tendons and ligaments strong. It also tones and strengthens the legs and buttocks. It makes the pelvic and hip muscles strong.
14) Naukasana with Crunches/Boat Crunch

Step-by-step Instructions:
- Lie on your back.
- Inhale and bring your legs 30 degrees above the floor.
- Raise your hands and bring your neck slightly above the floor.
- You know the pose is right when your toes are at your eye level.
- Now, bend your knees such that the legs resemble a table top.
- Stretch your legs back to the starting position.
- Repeat this exercise 10-15 times.
Naukasana with Crunches/Boat Crunch Benefits:
This exercise is excellent for toning your abdominal muscles. It strengthens the core muscles. It also helps in improving the digestion.
15) Virabhadrasana 1/Warrior 1 Pose

Step-by-step Instructions:
- Stand straight.
- Take your feet 2 to 3 feet apart.
- Twist your right foot towards the right side. Your left foot should point in the forward direction.
- Stretch your hands sideways, parallel to the floor and twist the upper body towards the right side.
- Take your arms upwards and bring them together in namaskar mudra.
- Bend your right knee and pulse three to four times.
- Slowly release and come back to the starting pose.
- Repeat the same on the other side.
- You can do 8-10 repetitions on each side.
Virabhadrasana 1/Warrior 1 Pose Benefits:
This pose makes your shoulders, arms, legs, ankles and back muscles strong. It energizes the whole body. You also get an excellent stretch to your arms, shoulders, belly and groin.
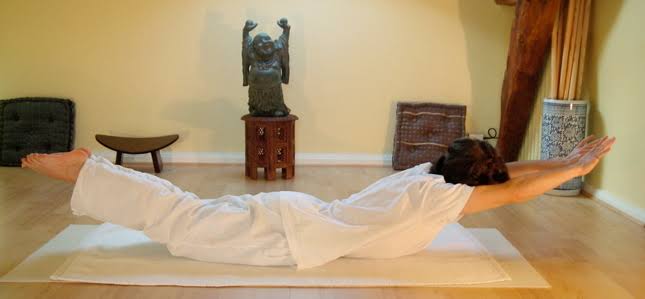
16) Shalabhasana/Locust Pose
Step-by-step Instructions:
- Lie on your abdomen
- Place your hands under your thighs for support
- Inhale and lift your legs and take them as high as you can
- Exhale and slowly bring your legs down
- Repeat this for 8-10 counts
Shalabhasana/Locust Pose Benefits:
Shalabhasana is a great practice to strengthen your lower body. It tones the abdomen. It makes the back muscles strong and is beneficial for people suffering from sciatica or lower back pain.
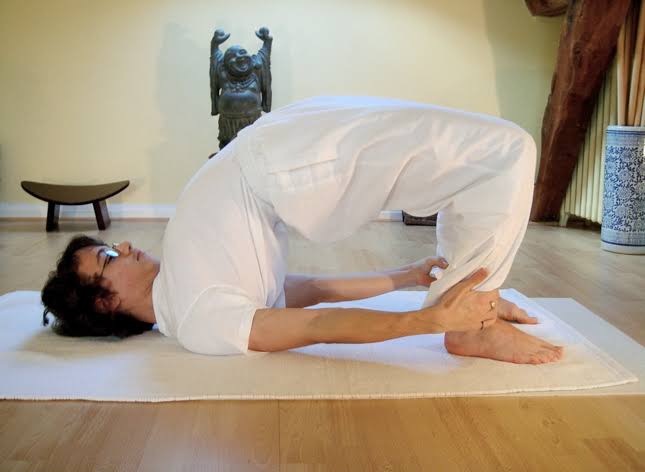
17) Setu Bandha Sarvangasana/Bridge Pose
Step-by-step Instructions:
- Lie on your back
- Bend your knees and place your legs hip-width apart
- Rest your arms beside your body. Your palms should be touching the floor
- Now inhale and slowly raise your hips, lower back and upper back off the floor
- Clench your buttocks and hold the pose for 5-8 seconds
- Slowly release while exhaling and repeat for 8- 10 counts
Setu Bandha Sarvangasana/Bridge Pose Benefits:
This practice strengthens the chest, spine, and buttocks. It also makes your hamstrings strong. Do this practice daily if you suffer from backache or a headache.
18) Dhanurasana/Bow Pose
Step-by-step Instructions:
- Lie on your abdomen.
- Fold your legs such that your heels touch your hips.
- Catch your ankles with your hands and inhale.
- As you inhale, lift your legs upwards away from your body.
- Your upper body automatically gets lifted. Exhale.
- Your pose should resemble a bow.
- Hold for 8-10 breaths.
- Slowly release and relax.
Dhanurasana/Bow Pose Benefits:
Dhanurasana is a great pose for reducing belly fat. It makes the spine flexible. Internal organs like your kidney, stomach, and pancreas get a good massage, and so their functioning improves. It makes your thighs, ankles, groin, and abdomen strong.
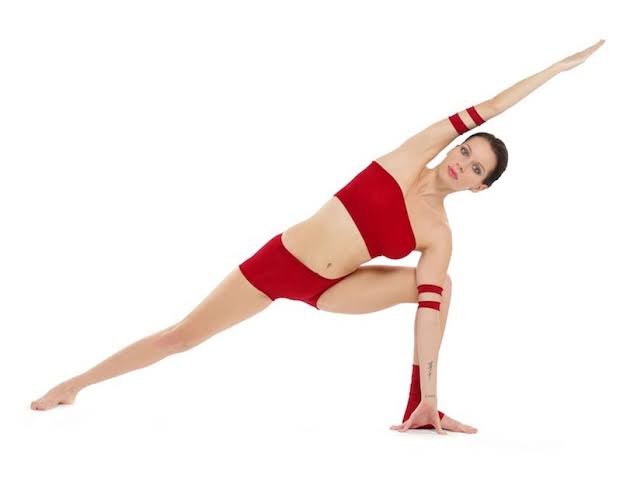
19) Utthita Parsvakonasana/Extended Side Angle Pose
Step-by-step Instructions:
- Stand straight.
- Take your legs 3-4 feet apart.
- Raise your hands and bring them sideways in line with your shoulders. They should be parallel to the floor.
- Turn your right foot towards the right side.
- Bend your right knee and stretch your left leg a little backwards. Align both your legs such that your body is balanced.
- Place your right palm in front of your right foot.
- Raise your left hand upwards facing the sky.
- This is the final pose. Now hold this pose for 5-8 breaths.
- Repeat the same on the other side.
- You can do 5-8 counts on each side.
Utthita Parsvakonasana/Extended Side Angle Pose Benefits:
This pose strengthens the knees, legs, ankles, legs, shoulders, chest and spinal cord. It puts pressure on the abdomen and tones the muscles.
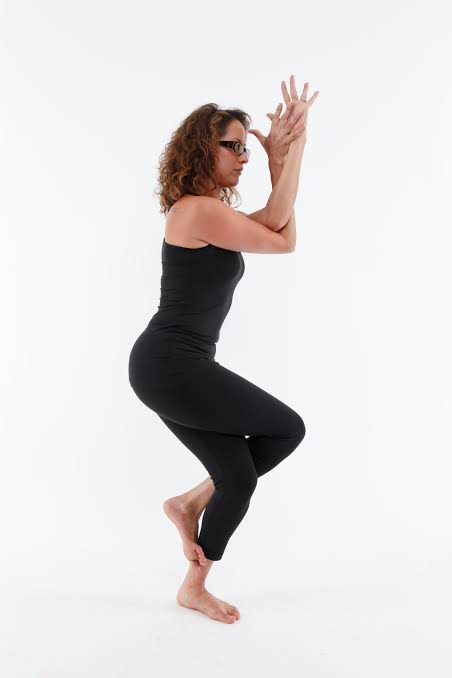
20) Garudasana/Eagle Pose
Step-by-step Instructions:
- Stand straight. Keep your feet a few inches apart
- Bend your knees slightly
- Now, raise your left leg a little and take it over your right leg
- The front part of your left foot should touch your calf
- Stretch your hands outwards
- Take your right arm over your left arm and fold them
- Your right palm should be facing your left palm
- Maintain this pose for 8-10 breaths
- Now repeat by reversing the arms and legs
- You can repeat this exercise for 8-10 counts
Garudasana/Eagle Pose Benefits:
Garudasana is great for improving the balance and neuromuscular coordination of your body. You will experience a stretch on your shoulders, thighs, upper back, and buttocks. It helps in enhancing the flexibility of arms, chest and waist. It also strengthens the legs, ankles and calves.
Now that you are familiar with these power yoga poses, you can try them regularly. Regularity is the key to perfection.
Try all these power yoga poses and see which ones you are most comfortable with. The ones that you find hard should be practiced by you every day.
You can start slow and gradually increase the duration of your workout. If you are regular with your practice, you will be amazed by the results. So be patient and keep working towards a graceful figure.
FAQs
1) Should I avoid power yoga during pregnancy?
Ans- If you are pregnant, you should avoid some yoga positions including the lying positions, especially in your first trimester. You can try meditation and light yoga such as Cobbler’s Pose, Warrior Pose etc. if you want to during the later stages of your pregnancy.
2) I am taking medicines for many things. Can I still do Power Yoga?
Ans- Yoga has been around long before the medications. But it is better to consult with your doctor before indulging in any physical activity.
3) Can I eat before doing power yoga?
Ans- You should do power yoga at least 2-3 hours after having your meal.
Let us know which power yoga poses you love to do in the comments below and do share the article with your loved ones to help them bring yoga in their daily life.




excellent post.
Hello Ishita,
Awesome post.
Whenever we think of intense workout and strength and flexibility, power yoga is one of the best option for us. Well said Ishita, it not only enhances the stamina and balance and burns more calories but also leaves us energized.
Thanks for sharing all these various yoga poses in such a detailed way as it will also help lots of beginners. Important thing is that we can practice and perform this yoga anywhere. One more thing you mentioned is very important, yes it is a regular practice as a regular practice and a gradual increase in the duration of this yoga workout will only give us amazing results.
Thank you,
Rijhu